I thought I would start by making my first Cannabis Basics posts revolve around the most fundamental aspects of cannabis that I could possibly think of. I assumed that if an individual were to be a beginner toker one of the first things they would want to know was: how do I go about actually consuming this plant? I mean, the essentials of altering your mind-state with something like alcohol are relatively self-explanatory: pour in a glass and sip. Although, newcomers to the world of cannabis have an extensive variety of options when it comes to forms of cannabis, as well as methods of consumption.
In this particular post, I will focus only on the most basic form of cannabis, the dried plant, also known as flower. This is your classic old-school bag of “oregano,” or if you are shopping in a dispensary, it’s the winsome green bunches of bud that you may see decoratively on display in glass jars.
Although, once you have sniffed inside a few containers and chosen a strain that has properties suited to your personal preferences, your flower still has some ways to go before it’s inside your bloodstream and enhancing your world.
GRINDER AND SOME HEAT
The following methods mentioned in this post will all involve using your lungs, so the first two things you will need to have on hand are: something to break up your flower, and then something to heat it. Although heating and inhaling your cannabis is the least health conscious way to consume it, there are certain methods that will mitigate the amount of damage inflicted onto your breathing sacs, swallowing tubes, and pearly eating blocks. And despite some of the mess and effort, I truly believe that the methods of inhaling flower are superior to any edible, extract, or concentrate in terms of pleasure and diversity of effects.

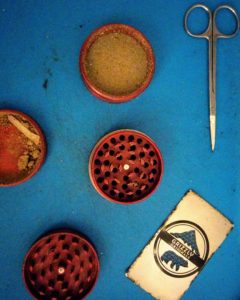
So, your first task after buying your strain is to take your buds and crush them up so that they are ready to use. A person’s preferred method of grinding can be as personal as their chosen method of smoking, although overall your goal is to break the weed into confetti, not powder. On certain strains, a comb through with fingers can be a nice intimate way to prepare your weed, although this can be nearly impossible on highly dense and sticky weed. During some of my thriftier living days, I found my hands and a pair of scissors to be a sufficient enough grinding tool for most weed. Although, nowadays, I am subscribed to the efficiency of a 4-piece metal grinder.
FLOWER/HERBAL VAPORIZER
I will be listing the following methods starting with what I believe will be the easiest to use, and then progressing towards more advanced techniques. This first procedure is a top choice for most, as it is modern, convenient, and doesn’t involve any harmful combustion. A portable or desktop vaporizer is not only the tactic most likely to be user friendly to newbies, but it is also the most discreet, and the least damage causing way to inhale cannabis. While a flame heats weed to temperatures reaching thousands of degrees, a vaporizer heats the herb to precise temperatures, so that only the vapors are inhaled and no smoke is produced. This results in a relatively clean and odorless exhale, as well as a relatively “cleaner” feeling high.

The methods of usage here will depend slightly on the make and model of your particular vape and will hopefully be included in the user manual. Although, generally, you will need to fill up a chamber with your ground herb, switch on the device, and wait for it to heat up, before you draw from the mouthpiece. The temperature you vape at will augment the effects that you feel, and it is indeed possible to customize your vape temp to produce specific desired effects. However, to get the most from your flower, I recommend starting at a temperature of about 180°C (356°F) and then slowly increasing up to about 220°C (430°F) as you reach the end of your bowl.
PIPE/BUBBLER
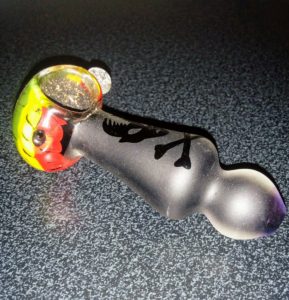
This method is extremely tried and true, and consequently, one I believe could be easy to manage for inexperienced lungs. Pipes can come in a multitude of forms, from a makeshift apple pipe, to the ancient chillum, to an intricate water-filled bubbler pipe, although most of the basic principles are conserved no matter what your paraphernalia’s appearance. A conventional glass weed pipe has three important elements: a bowl, a carb, and a mouthpiece. The bowl is where you load your crushed weed (fill and pat, but not too tight), and the mouthpiece is where your lips will go after your weed is packed. Hold the pipe in your non-dominant hand and cover up the tiny hole on the outside of the bowl with your thumb. With the pipe to your lips, hold your flame in your dominant hand, put it to the edge of the bowl, and pull in air with a bit of strength to light your weed. Once you see the cherry in the bowl, your weed is lit, and you can release your thumb from the choke and inhale more smoke. The choke (carb) will dictate the airflow through the bowl, so you may hold and release your thumb as you please to control the strength of your hits. It will be necessary to relight the herb when the cherry extinguishes, and you will also need to hold the flame deeper inside the bowl as you progress through your hits. Once the all of the green disappears, your bowl is cashed; turn it over, tap out/scrape out the black ash and reload as desired.

BONG
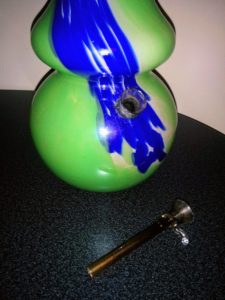
A bong is a tool that definitely takes a little practice (and also a potential extra hand), although, it can be a ton of fun, as well as beneficial to use once you get the hang of it. The basic principles of a pipe are also conserved here, although on a much larger scale, and with the added element of some water filtration. A bong is a tool that allows your smoke to pass through water, which filters some of the yucky particles out of your combusted weed. Some bongs also may contain added features to further enhance the benefits of this convoluted smoking method. For example, I own a bong with an ice catch, which are notches in the stem that allow you to suspend ice cubes inside, and a percolator, which are arms that diffuse the smoke. These additions act to cool down the herb before it reaches you, in order to make the hit extra friendly on your lungs.

There are two basic designs when it comes to bongs, non-carburetor and carburetor bongs. Usually glass or larger pieces will have a bowl and stem that lifts out (noncarb), and small or plastic pieces will have a choke hole (carb) lying on the opposing side of a fixed bowl. Whatever your model, you need to start by filling her base with a small amount of clean water, so that she can really do her job well. In order to know how much to fill your globe, look inside for the stem coming out from behind the bowl, the opening(s) of this stem need(s) to be fully covered with water to allow proper filtration.

In order to take your hit, I recommend starting with a comfortable sitting position; I personally like to place the bottom of a large bong between my legs for stability. Now, holding the bong steady, tilt or angle her slightly towards your body, so that you have a good view of your bowl. At this point you should be ready to light your packed weed, much like the pipe, although with more lung power. Holding onto the choke in the back (if you have one), you light your bowl. Bring your flame over top of the weed, while securing your lips inside the top of the bong, creating basically an air-tight seal with your face. Lightly pull in air to light one corner of the bowl, and consequently, fill the chamber of the bong with smoke. Now you are ready to take in a large but smoothly filtered hit; without breaking the seal at the top, get ready for a big inhale (if you feel the need to come up for air hold a hand or chin over the top to keep the smoke from escaping, then exhale). In order to clear the bong, you must lift the bowl totally out of its hole or uncover the choke, then take a relaxed, but strong and deep inhale, all the way to cavernous depths inside your lungs. Try your best to suck up all the smoke trapped in the bong, but if you don’t have the lung power, hold your hand over the top hole to save the smoke and then go back for seconds. A few runs with your bong will help you get the feel of how hard to pull and will refine your technique.
JOINT/BLUNT
The step by steps of smoking rolled weed are obviously uncomplicated, you put one end to your lips and suck smoke to your lungs. Although, the process of rolling requires some prior knowledge, a whole bunch of practice, and ultimately, the gift of dexterous and nimble fingers. Rolling is somewhat of a craft, and it is also the least lung-friendly method mentioned, therefore, I have deemed rolling joints and blunts to be the least beginner-friendly option for smoking weed.
I will now, however, confess my sins and admit that about 98% of the cannabis that I ingest is from an impeccably rolled joint. I personally find rolling to be the most convenient way to travel with flower, smoke on the go, and the easiest way to share with a group. With joints, there is no added fuss of packing bowls, cleaning ash, transporting paraphernalia, or charging batteries. Also, with the proliferation of dispensaries, newcomers will be able to skip the hard part altogether and purchase pre-rolled joints. Although, I will always recommend that cannabis virgins attempt to start with the least harmful methods possible. And therefore, this post will not include a more than a quick rolling tutorial.

In anticipation of Canada’s legal cannabis market, many dispensaries are expecting various extractions of flower to be bigger sellers to novice consumers than the unadulterated herb, and they are expanding their stock accordingly. Many of these items are extremely user friendly, for example, ready-to-use vape pens that come pre-loaded with concentrated oils, or ready-to-consume tinctures or edibles. Although, I firmly believe that for recreational usage, nothing has more pay off than buying, breaking, and burning your own cannabis flowers. And it is easy enough to do, with just a little guidance and some really enjoyable practice.

